National Water Center, Eureka Springs, AR
Updated: April 2014 Contact: Contact: NWC
Contents ©1999-2014 by National Water Center. All rights reserved worldwide.

National Water Center, Eureka Springs, Arkansas

55 Gallon Drum Compost Toilet Guidebook & Plans
by Stan Slaughter
I. Procedure for building the basic toilet top.
a. Assemble the tools and materials necessary.
b. If using 1" hardwood for the tap, glue and clamp it together.
c. Lay out and cut out the vent and toilet hobs in the top.
d. (Optional) Cut out a piece of 3/4" plywood to fit under the hardwood top for reinforcement.
e. Build the lid of your choice from dimensions (Use 1- 1 1/2" nails).
f. File the edges of the seat hole to smooth them. Install the regular toilet seat now if you are using one.
g. Using the hinges locate and install the lid with the foam sealant in place on bottom of lid.
h. (Appearance options) Install the 1/2 X 2 X 30 pieces for the tri-band around the edges of the top. (Use finish nails)
i. Install the 1" X 2" trim skirt under the toilet 1" in from the edge. (Using 2" wood screws)
j. Paint or stain the top as needed. Sand thoroughly and apply at least two coats of marine grade Spar Varnish or similar sealing varnish to top, bottom and sides.
k. Install the 1" strip of foam weather striping under the top to seal the barrel to the top, if this applies.
Materials and tools lists for toilet tops.
IV. Building Your Barrel Drum Unit
1. Choosing the right barrel. Long life is the best reason to pick a good barrel because urine corrodes plain steel. You should look for lined barrels. There are two common types of linings. One, a sprayed on plastic, is likely to degrade rapidly. The best lining is baked-on phenolic resin, incorrectly called Teflon lined. It is red-brown in color. Barrels of this type with clamp on lids generally cost $10 - $20 and are a bargain if in good condition. Avoid uncoated barrels and solid top barrels. The best sources of lined barrels include farm feed mills (molasses), honey farms and food processing plants.
2. The vent system. The air passages that pass thru the barrel are the most important part of the toilet. They provide oxygen and take-away moisture and carbon dioxide.
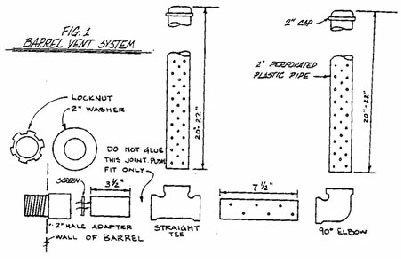
Assembly procedure. Barrel vent system. (Fig. 1)
a. Cut all pieces to length.
b. Using a drill and sabre saw with metal cutting blade, cut a 2" hole 3" up from the bottom of the barrel. Check to see if the male adapter fits the hole.
c. Glue the 22" uprights into the T and EL. Glue the caps on the 2-22" uprights.
d. Glue the T and EL together using the 7 1/2" piece. Be sure to get the uprights parallel and in the same plane.
e. Cut the screening to fit inside the 2" male adapter. This is the fly screen. Check to see that it will be fly tight when glued. Glue the 3 1/2" piece to the 2" male adapter with the screening between the two pieces.
f. Glue the 3 1/2" piece to the open end of the T and let dry (10 - 20 minutes).
g. Using a 1/4" drill, make holes throughout the vent system as shown.
h. Install the vent system by sticking the male adapter thru the hole in the barrel and screwing either the female adapter or the lock nut and washer onto the adapter. When using the 2" female adapter, spacing washers may be needed. Use silicone caulk liberally to seal the opening.
3. Final touches. Use good quality exterior paint to protect the outside of the barrel. Touch up any rust spots.. You may want to buy or make handles for the barrel. They are optional and possibly not necessary.
Tools
1/4" Drill
Sabre Saw with metal cutting blade
Pipe Wrench or Slip Joint Pliers (tighten threads)
Sand Paper
Scissors
Hack Saw (cut ABS pipe)
Materials
1
1
55"
1
1
2
1
1
1
1
Lined Steel Barrel
(Cartridge) Silicone Caulk
2" ABS Pipe 2-2" x 22" ABS pieces
2" ABS T 1-2" x 3 1/2" ABS piece
2" ABS EL 1-2" x 7 1/2" ABS piece
2" Caps ABS
2" Male Adapter
2" Female Adapter ABS (or lock nut and washer)
Small Can ABS Glue
5 sq. in. piece Fly Screen (fiberglass or stainless steel)
You should now have a drum compost unit ready to use.
V. Building the Toilet Seat
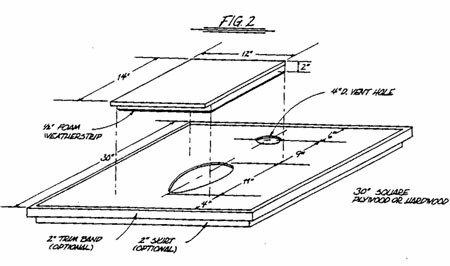
The toilet sea design can be used whether the barrel is under the floor or above the floor. The wood can b either plywood or 1" hardwood, but it must be dry and well sealed. If the hardwood is used, an exterior grade of plywood should be used under it because of the exposure to moisture and to provide a flat surface for the barrel to mount.
We suggest building a 30" square as shown. The lid is different from a conventional toilet in that it must close air tight. If a regular liftable seat is necessary, simply build the lid larger to cover the seat.
We suggest leaving a 1" lip on the front of the lid. (See fig. 2) This functions as a built-in handle and it looks nice too.
Tools
Skill Saw or Table Saw
(Optional) Router
Glue (Waterproof Resorcinol if possible)
Glue Clamps for Hardwood
Drill and Bits (Pre-drill screw holes)
Screw Driver
Hammer
Square
Wood Rasp
VI. Installing the Unit
Your basic unit is now ready to install. We will consider three possible locations for installations.
1. Outhouse. Here the barrel unit is installed outside the home, either with or without a structure around it. In this case, very little is needed. Provision for steps to the barrel and support for the vent pipe are the main needs.
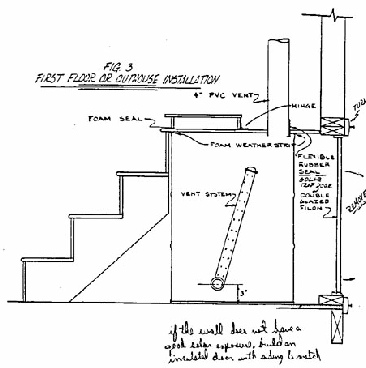
2. First Floor Installation. Here the barrel is used inside an enclosure inside the home. the main disadvantage is moving the barrel into and out of the home. The best answer is to build a small solar trap door on the exterior wall of the house (See Fig. 3). A second alternative is to move the barrel through the house and out an existing door. A wheeled dolly would be very necessary for this installation. Rolling a 300 pound steel barrel on finished floors is NOT recommended. Because each installation is different, the drawing and this discussion are the limits of our coverage of the first floor installation.
3. Sub-Floor Installation. This is preferred method for in-house toilets (See Fig. 4). This system allows maximum flexibility in designing the seat unit itself. (No steps needed.) Mounting the barrel below the floor requires about 4' of clearance under the floor in a basement, crawl space or under a porch. One disadvantage is the climbing of any steps required to remove the barrel. If you choose this route you will need a good dolly with straps.
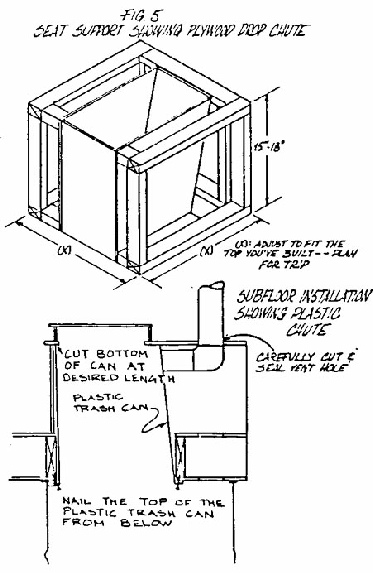
a. Locate the hole for the drop chute. Try to avoid existing floor joists. A 12" diameter hole is sufficient. Cut the hole through flooring and sub-floor. A rectangular hole should be used if the drop chute is to be plywood. We recommend the use of a Rubbermaid trash can as a drop chute.
b. Build the seat support from 2x2's. (See Fig. 5). 15" - 18" is a good normal height for the seat.
c. Mount the seat top to the seat support using wood screws.
d. Go to the underside of the floor. Cut out a 30" x 30" piece of 1/2" to 3/4" plywood. If you are using a plastic drop chute, you will need a hole to fit the top of the trash can. If using plywood, a 12" x 12" square hole will be sufficient. e. Nail the 30" square of plywood to the Underside of the floor.
f. Nail and silicone caulk the plastic position. Caulk and seal all seams.
g. Position the sealing weatherstrip in a circle to seal the barrel on the underside of the plywood An extra lid to a barrel makes an excellent gasket gasket and guide for positioning. Simply cut the drop chute hole through the lid as through the plywood as In step 3.d.
4. We are now ready to build the platform that supports the barrel. Because the barrel must seal tightly to the sub-floor, we use 3-4 wedges to "jack" the barrel into position. 3" of space is required above the top of the barrel for sliding the barrel in and out.
Procedure:
a. Build a 36" square platform to support the barrel. Use 7 -
2" X 4" X 33" on 6" centers.
b. Measure and cut legs to support the platform either from
the floor (best choice) or from the floor joists above. Be
sure to allow 3" head space above the barrel.
c. Lay out and cut out 5 wedges ( Fig. 4 Make sure to nun the
grain as shown. Use 2 X 6's.
d. Finishing up.
1. Look for places to varnish and seal.
2. Make sure the system will be air tight.
VII. Building and Installing the Vent Stack
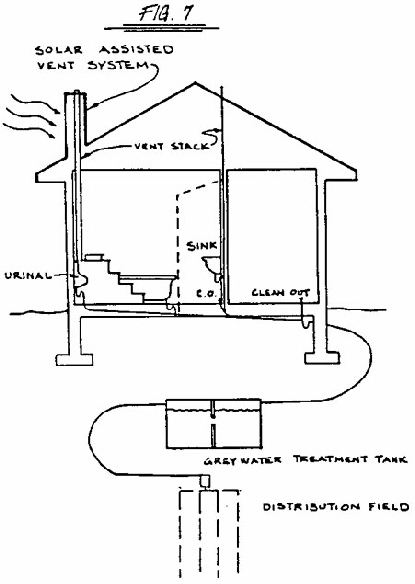
All installations will need a vent stack. The purpose of the stack is to pull air up through the barrel. This evaporates moisture from the contents of the barrel. and provides oxygen to the organisms that do the composting. To accomplish these goals the vent stack must be tall enough to provide a good draft. The top of the pipe must keep out rain and insects. In cold climates the stack pipe should be insulated to keep moisture from freezing inside the pipe. A solar chimney is a good way to avoid the freezing problem and improve the draft.
1. Procedure - Building the Stack
a. Use a minimum of 1-10' section of 4" PVC Pipe as the stack. The top of the stack should be as high as the roof pear or 10' distant from a taller section.
b. Cut the fiberglass or stainless mesh to fit inside the 4" T. Push it into place.
c. Glue the T to the upper pipe section.
d. Cut 2 rain shields as shown.
e. Glue the shields to the ends of the T.
2. Procedure - Installing the Stack
a. Use a plumb bob to locate a point on the ceiling directly above the vent hole.
b. Cut a hole in the ceiling material and then use a plumb bob to locate the hole on the roof.
c. Cut a hole in the roof 4" in diameter, install the vent stack from the roof down, use a 4" flashing and roof tar to seal thoroughly.
Apply silicone caulk to the vent hole in the toilet seat. Insert the vent pipe and caulk again. If using a plastic drop chute, the vent pipe should enter the plastic drop chute as high as possible. (Use a 900 EL and straight pipe to make the connection. Seal the hole in the drop chute well. Caulk the hole in the ceiling and install a 4" trim collar to cover.
3. What to do with your flue. Three of the options are a solar flue, an insulated flue and a plain pipe. The solar heated chimney is recommended because it improves draft and reduces condensation. The insulated flue works to reduce condensation but not as well as solar. The plain flue in winter probably will have some problems with poor draft unless the barrel is in a heated area. This is the reason commercial units have fans installed to maintain draft and moisture evaporation. Another option might be a 6" vent turbine to exhaust air when the wind blows. This area needs more research. I would like to work closely with you on vent plans.
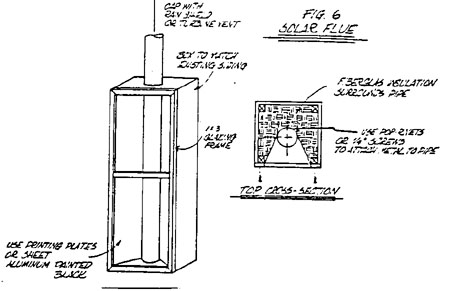
Option One - Solar Flue (Fig. 6)
Above the roof lay out and build a 12" square chimney box for the solar flue. Use 2" X 2" as stuns: Insulate the pipe on 3 side with fiberglass. Cover the fiberglass with light metal painted black and leave the pipe exposed on the south. Another option is to stop the 4" pipe at roof level, line three sides of the chimney with 2" foam insulation, painted black, and use the box as the chimney. Rain and insect protection are still necessary.
Leave the south side glazing till last. Build a glazing frame from two layers of fiberglass reinforced plastic (filon or kalwall) with a 1 X 2 frame between. Use appropriate trim boards to finish off the flue. Attach the frame with 1 3/4" X 1/4" lag bolts into the chimney frame. Use foam strips to seal it up.
Option Two - The Insulated Flue
Build the flue laying flat and then install it in one piece. Get enough 6" or 8" metal pipe to match the flue height. Wrap the 4" PVC pipe with 1" or 2" of fiberglass batt insulation (buy 6" x 15" unfaced). Assemble the larger pipe by snapping each piece together and using long metal screws to hold the sections together and both layers of pipe together. Mount a large rain cap over the top and seal the gap generously with with roofing tar. Mount a 6 or 8 inch flashing on the roof and set the flue in place. Brace it to eye bolts and wire.
Option Three - The Plain Flue
Mount the vent stack in the flashing provided and brace it off with eye bolts and wire.
Materials for Flues:
This is a general list, no quantities.
Plain Flue:
2 - 10' 4" PVC Pipe
1- 4" PVC T
16 sq. in. Insect Screen
1- 4" Roof Flashing (Dectite)
Eye Bolts and Galvanized Wire
Roof Tar
Insulated Flue:
8" or 6" Flashing
6" X 15" Roll Fiberglass Batt
8" or 6" Pipe
1 1/2 or 2 1/2 " Long Metal Screws
Large Rain Cap or Turbine
Solar Flue:
2" X 2" Framing
Trim Boards
Black Paint
Siding
Insulation
Pop Rivets
Filon or Kalwall Glazing
Lag Bolts
Offset Printing Plates
Large Rain Cap or Turbine
1" X 2" for Glazing Frame
VIII. Compost Management And Troubleshooting
Normal use of the toilet involves managing a complex biological community. However. nothing is required in normal operation, other than looking for signs of trouble.
Three of the problems are:
1. Rapid accumulation of waste
2. Insects
3. Too much liquid content
Plywood
1/2 sheet
1
2
2
1
4
4
1
14’
1 quart
1 quart
3 sheets
30
10
4 X 8 X 3/4" Ext
30" X 30" piece
12" X 1" X 2" Top, Front, Rear
14" X 1" X 2" Top, Sides
13" X 14" Top of lid
31" X 1/2" X 2" Trim band
28" X 1" X 2" Trim skirt
Pair Hinges
1/4" X 1" Camper seal foam or equivalent
(Seal for lid and barrel)
Marine grade spar varnish
Paint or stain as required
150 grit sand paper
3/4" finish nails for band
Wood screws for trip skirt
Hardwood
14’
1
2
2
1
4
4
1
14’
1” x 10” Oak, Walnut, Cherry
30" X 30" top (Plywood optional)
12" X 1" X 2" Top, Front, Rear
14" X 1" X 2" Top, Sides
13" X 14" Top of lid
31" X 1/2" X 2" Trim band
28" X 1" X 2" Trim skirt
Pair Hinges
1/4" X 1" Camper seal foam or equivalent
(Seal for lid and barrel)
